#BuildAScoreboard

Win a 3D Printer

Winners!

After an exciting and nail-biting final, France has been crowned champions of the world.

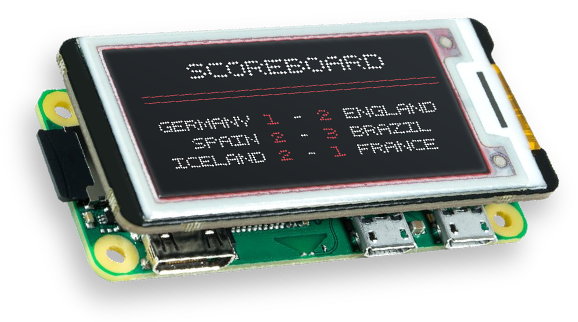
Thank you to everyone who got on board with Mouser throughout the tournament. We had some very exciting entries. However, there can only be one winner. Which takes us to the more important announcement, the winners of our #BuildAScoreboard competition:

    1. Daniel R. (@danr2k5 )
    2. Mariano F. (@fernandezabadia)
    3. Oscar V. (@oscman71)


Congratulations! Until the next World Cup in 2022!

See how some of our participants built their scoreboards

Cheering Scoreboard 
You think of a traditional scoreboard as being a simple visual display with the teams and number of goals displayed. Which is enough to get the job done, but it's not particularly interesting. It doesn't make you feel a part of the action.

What I wanted was to feel involved. To experience the game as though you're there in the stadium. A stadium can be an onslaught of the senses, so I had to choose. The sense with the most correlation to the score just has to be the cheering of the crowd. The better your team is doing, the louder you chant and shout. Based on this, I decided to build an audio scoreboard. I also figured that 40,000 people cheering results in a sound essentially similar to white noise. 

To make it a real-time experience, I wanted it to update live, so you know the score throughout the match. To do this, I looked for web APIs that I could get the data from. There are a few available, and I used worldcup.sfg.io. This gave the data as a JSON file. I accessed this using an ESP8266, which is like an Arduino with built-in wi-fi. They can also connect to Google Home, so I've used these all around my house to automate things like my projector screen and Christmas lights. 

The Build
Initially I tested different ways to create white noise. My original idea was to build a circuit of discreet components, which would have given the white noise desired, but controlling the volume would be difficult. A stepper motor and a pot would have been a cool way to adjust the volume, but I only had one motor available and required stereo sound. 

The next option was to recreate the noise in software and amplify it with a basic stereo transistor amplifier. To create the sound I used an Arduino Nano and the software-based random number generator. I outputted a PWM signal of random duty cycle (power) for a random length of time, then turned it off for another random length of time. This was then amplified by the discreet transistor amplifier and resulted in the cheering sound I was aiming for. 

To control the volume, I put a scaler figure into the PWM control. Doubling the output didn't double the volume however, so for every point, I increased it significantly. This worked perfectly, ensuring the difference between points was suitably noticeable. To get a stereo effect I simply duplicated it. Bingo, we have a basic (non-networked) scoreboard. 

Next was to get the live updating working. Using the ESP8266, I set it to access the API once every 30 seconds. From the API, I only needed the "home" score and the "away" score. There are various options for reading JSON, but luckily, the API has some optional parameters that provide exactly what I needed. I just translated the output into a number, sent it from the ESP8266 to the Arduino Nano via i2c and fed it into the PWM scale factor. Whenever there's a match on, the score keeps updating and whenever anyone scores a goal, the noise for their side increases. 

The Result 
The end result was a little crude, but it did work and it was plainly obvious which side was winning. With a 3D printer, I could build an enclosure for it to make it a little prettier. I also considered using the web interface on the ESP8266 to display the teams’ flags. That way, I could have used a couple of old smartphones or tablets to connect directly to it and added to the visual effect, resulting in a multi-sensory experience. 

I also considered that if I did have a 3D printer, I could turn it directly into a scoreboard. Some 3D printers can be controlled directly through a reverse-engineered USB cable. Utilising the same API on the ESP8266, it should be possible to have the 3D printer physically print the score whenever it changes!

Introduction
A sports scoreboard is a panel where the audience can see the live results of sporting events.For years the scoreboards of the stadiums have gone from being elements Liabilities As 7-segment displays, or Split-Flap displays to big screens (LCD, dot matrix…). These screens in addition to color scoreboard can show another relevant match information. With this philosophy I chose a laptop LCD screen as a board.

This marker is built on the occasion of the World Cup of 2018. Therefore, we will give you connectivity to the network to be able to show live the results of the World Cup.

Materiales
A recycled LCD laptop screen.- An LCD display controller with HDMI.- A Raspberry Pi.- A 12v @ 5a power supply.- A HDMI line.- Plywood and wood slats.- Custom Adhesive Vinyl Sheet.- Screws 3mm.- Hot glue.- A Joypad or USB keyboard.- Aluminum plate.Hardware.

Box.The box is made of plywood. With a saw we cut the structure. We screwed and glued withclamps. We make the cable holes.

Screen.The screen we got from an old laptop. The screen controller can be achieved at a veryaffordable price on the Internet. This has different video outputs like HDMI or VGA.Controller.I use a Raspberry Pi as a processor. The HDMI output allows me to connect to the controllerof the LCD screen directly and with the USB ports allow me to use a remote control andprogram on site with a keyboard and a mouse.

Assembly
On the built box we glue the screen with hot glue, insert all the components in the box andput the adhesive vinyl. We place the aluminum plate as trims.

Software
The operating system of the Raspberry Pi is Raspbian. Raspbian is a Linux distributionDebian-based but optimized for the Raspberry Pi. Within this environment we run a Python programmed application using the graphical API of the 'pygame' module (with an interface like SDL libraries). The Internet connection is managed by the OS. The code consists of 3 layers: menu, local marker and live marker. 

The graphics are designed on a laptop. Via USB ports we have programmed directly into the raspberry Pi using the Python IDLE. The menu layers and live scoreboard make requests to the http://livescoreapi.com/WebAPI that offers global live results from soccer leagues matches andcompetitions. It has a free version and the payment is low cost. 

The information given by theWeb API is usually delayed between a few seconds and several minutes. I know that this problem could be solved with a more powerful API (and therefore higher price).

View photo gallery »


My Scoreboard - a live RSS reader that send its data by Bluetooth to an Arduino 101.
I’ve worked with projects with Arduino before, but this is my first with an Android application. After installing all the software and getting familiar with the Java code I started with following multiple tutorials, to understand the basic functionality Android Studio. Below are all the links of all the tutorials I followed to create this project.

To get the live soccer scores, a RSS feed is used. This application can enter all the online RSS feeds, but in this project I made filters to fit it only to a provided soccer feed. This feed shows all the soccer matches worldwide, so a function with a list of all the teams, the correct World Cup matches can be filtered. This is added to a separate list, where it get formatted to one string that is send automatically to send to the Arduino. The Bluetooth pairing is done within the app. 

The Arduino receives a string that only needs to be formatted (scores, home/away team and the match progress) before it is send to the LCD screen. 

It was a fun project and I learned a lot by making it. 

Software Resources 
Link Android basic app tutorial: 
https://codelabs.developers.google.com/codelabs/build-your-first-android-app/#0
Link Android RSS reader tutorial: 
https://www.androidauthority.com/simple-rss-reader-full-tutorial-733245/
RSS soccer feed: 
https://www.scorespro.com/rss2/live-soccer.xml
Android/Arduino Bluetooth tutorial: 
http://solderer.tv/data-transfer-between-android-and-arduino-via-bluetooth/

Hardware resources
Arduino 101
https://nl.mouser.com/ProductDetail/Intel/ARDUINO101?qs=sGAEpiMZZMtqt%252bBdzIqtUPrVR%2fEKKz%252bhl%2ftnG5GOVDI%3d  
Seeeds Shield:
https://eu.mouser.com/ProductDetail/Seeed-Studio/103030000?qs=%2fha2pyFaduiww3BefZGn%252bsMVpWEJToT1RYhKfdfyX6NHFr5vgBrzAg%3d%3d
Seeeds Grove RGB LCD
https://nl.mouser.com/ProductDetail/Seeed-Studio/104030001?qs=%2fha2pyFaduj%252bXJ5GXyDkS%2faCc%252barKgQCSvduEj9OrDYBTl71dnXbeA%3d%3d


Prizes

Scoreboards showing the correct final teams will have a chance to win:

1st Prize

FlashForge Finder 3D Printer – an easy-to-use, fully assembled 3D printer, plus 1 kg of black PLA-fillament, so you can start printing right away.

2nd and 3rd Prize

Mouser Ice Bucket, so you can have the coolest drinks at your next BBQ. 

All Winners will receive a Mouser T-Shirt. We will notify the winners after the final game on July 15, 2018, latest by July 28, 2018. Be sure to play to your advantage.


Take a look at the scoreboards we have built in the office

Privacy Policy | Terms and Conditions | ©2018 Mouser Electronics, Inc.